Adjustment of elevator square brake
The main types of elevator brake faults include: detection switch faults, damage to the brake contactor caused by freewheeling resistance faults, dragging caused by large braking gaps (regular up and down vibrations during elevator operation! If the amplitude is small, the encoder should be suspected), and excessive opening noise. The following mainly introduces the adjustment of the opening gap.
Place the elevator on the top floor (preferably with the weight on the buffer) and turn off the power.
The gap should be between 0.1 and 0.2mm when measured visually or with a feeler gauge. If it is larger, it should be adjusted (there is almost no gap that becomes smaller with use)
Adjust one of the brake pads first
Loosen the guide screw sleeves on the four screws that fix the brake band, and then tighten the four bolts by an equal angle in the direction with a small gap. Lock the guide screw sleeves and measure the gap. If it does not meet the requirements, repeat the adjustment
Adjust the other brake using the same method
Adjust the brake detection switch: tighten it first, slowly release it, and then release it 120 degrees (empirical value) after hearing the sound. The more synchronized the two switch detection, the better
Power on brake test: The fast train runs from the lower platform to the upper station, and when it reaches the third floor, the power is cut off. The braking distance should be observed to meet the requirements, otherwise it should be readjusted
Attention: The adjustment of the brake should be made by professional personnel, and the above is emergency response
Adjustment method for dual brake holding brake
Adjustment of braking force
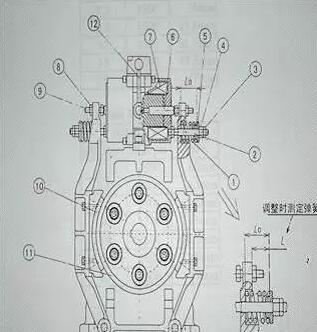
The adjustment of the brake should be carried out during elevator maintenance. Firstly, loosen the bolts at positions 3 and 4 on the outer side of the brake spring while the elevator is in a stopped state.
Adjust nut 4 to achieve the desired braking rate for the length of the spring. The length of the spring determines the magnitude of its braking rate, with specific values referring to factory settings or actual measured torque.
Finally, tighten the spare nut 3.
Attention: Loosen the double nuts, lengthen the springs, and the elevator car may move. Therefore, when adjusting, it is necessary to fix the elevator car properly.
Adjustment of brake arm action stroke
Cut off the power supply to brake coil 7.
Loosen the brake arm adjustment bolt 9 and nut 8.
Push the release handle 12 towards either side to fully extend the brake push rod, rotate bolt 9 to make contact with the end of the push rod, then rotate one more turn to tighten the nut.
The adjustment method for the brake arm stroke on the other side is the same as the above method.
Power on the coil.
Measure the gap between brake drum 11 and brake pad 10. The initial standard value is 0.2-0.3mm.
The gap between brake drum 11 and brake pad 10 should be kept as consistent as possible on both sides. If the gap is too large, a loud noise will be emitted during braking.
After the adjustment is completed, tighten the nut 8 on the adjustment bolt 9 and secure the adjustment bolt 9.
If the gap between the top and bottom, left and right does not meet the requirements, it can be achieved by adjusting the bolts 9 on both sides.


